kubernetes architecture and Multi-Node Kubernetes Cluster Setup Using Kubeadm with containerd and docker
Table of contents
- What is Kubernetes?
- Features of Kubernetes
- Kubernetes Architecture & Components
- Control plane components
- Worker node components
- Overview
- Prerequisites
- Installation Steps
- Install containerd
- Create containerd configuration
- Edit /etc/containerd/config.toml
- Install Kubernetes
- Disable swap
- Initialize the Cluster (Run only on master)
- Install Flannel (Run only on master)
- Verify Installation
- Join Nodes with docker installation
What is Kubernetes?
Kubernetes, also known as K8s is an open-source container management tool that automates container deployment, scaling & load balancing. It schedules, runs, and manages isolated containers that are running on virtual/physical/cloud machines. All top cloud providers support Kubernetes.
It was developed by Google in 2014 and is now maintained by the Cloud Native Computing Foundation (CNCF).
Features of Kubernetes
Container orchestration:
High availability
Load balancing
Self-healing
Automatic scaling
Rollouts and rollbacks
Configuration management
Secret management
Extensibility
Kubernetes Architecture & Components
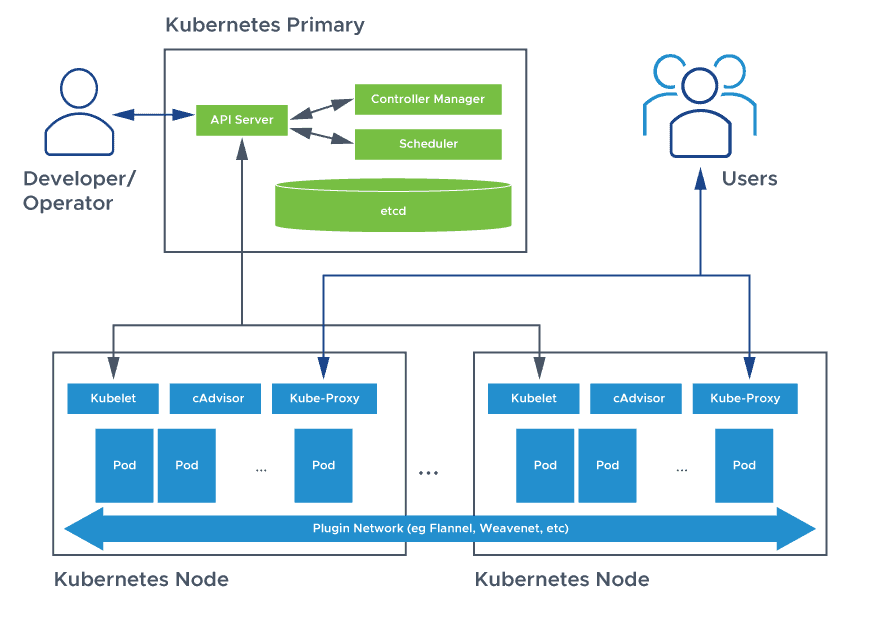
The Kubernetes architecture is based on a master-slave model, where the master node manages the entire cluster while the worker nodes host the containers.
Kubernetes control plane:- manages Kubernetes clusters and the workloads running on them. Include components like the API Server, Scheduler, and Controller Manager.
Kubernetes data plane:- machines that can run containerized workloads. Each node is managed by the kubelet, an agent that receives commands from the control plane.
Pods:- pods are the smallest unit provided by Kubernetes to manage containerized workloads. A pod typically includes several containers, which together form a functional unit or microservice.
Persistent storage:- local storage on Kubernetes nodes is ephemeral and is deleted when a pod shuts down. This can make it difficult to run stateful applications. Kubernetes provides the Persistent Volumes (PV) mechanism, allowing containerized applications to store data beyond the lifetime of a pod or node. This is part of an extensive series of guides about CI/CD.

Control plane components
API Server
API server exposes the Kubernetes API.
Entry point for REST/kubectl. It is the front end for the Kubernetes control plane.
It tracks the state of all cluster components and manages the interaction between them.
It is designed to scale horizontally.
It consumes YAML/JSON manifest files.
It validates and processes the requests made via API.
Scheduler
It schedules pods to worker nodes.
It watches API-server for newly created Pods with no assigned node and selects a healthy node for them to run on.
If there are no suitable nodes, the pods are put in a pending state until such a healthy node appears.
It watches API Server for new work tasks.
Controller Manager
It watches the desired state of the objects it manages and watches their current state through the API server.
It takes corrective steps to make sure that the current state is the same as the desired state.
It is the controller of controllers.
It runs controller processes. Logically, each controller is a separate process, but to reduce complexity, they are all compiled into a single binary and run in a single process.
etcd
It is a consistent, distributed, and highly-available key-value store.
It is stateful, persistent storage that stores all of Kubernetes cluster data (cluster state and config).
It is the source of truth for the cluster.
It can be part of the control plane, or, it can be configured externally.
Worker node components
A worker node runs the containerized applications and continuously reports to the control plane's API-server about its health.
Kubelet
It is an agent that runs on each node in the cluster.
It acts as a conduit between the API server and the node.
It makes sure that containers are running in a Pod and they are healthy.
It instantiates and executes Pods.
It watches API Server for work tasks.
It gets instructions from the master and reports back to Master.
Kube-proxy
It is a networking component that plays a vital role in networking.
It manages IP translation and routing.
It is a network proxy that runs on each node in cluster.
It maintains network rules on nodes. These network rules allow network communication to Pods from inside or outside of the cluster.
It ensures each Pod gets a unique IP address.
It makes possible that all containers in a pod share a single IP.
It facilitates Kubernetes networking services and load-balancing across all pods in a service.
It deals with individual host sub-netting and ensures that the services are available to external parties.
Container runtime
The container runtime is the software that is responsible for running containers (in Pods).
To run the containers, each worker node has a container runtime engine.
It pulls images from a container image registry and starts and stops containers.This readme provides step-by-step instructions for setting up a multi-node Kubernetes cluster using Kubeadm.
Overview
This guide provides detailed instructions for setting up a multi-node Kubernetes cluster using Kubeadm. The guide includes instructions for installing and configuring containerd and Kubernetes, disabling swap, initializing the cluster, installing Flannel, and joining nodes to the cluster.
Prerequisites
Before starting the installation process, ensure that the following prerequisites are met:
You have at least two Ubuntu 18.04 or higher servers available for creating the cluster.
Each server has at least 2GB of RAM and 2 CPU cores.
The servers have network connectivity to each other.
You have root access to each server.
Installation Steps
The following are the step-by-step instructions for setting up a multi-node Kubernetes cluster using Kubeadm:
With containerd:
Update the system's package list and install necessary dependencies using the following commands:
sudo apt-get update
sudo apt install apt-transport-https curl -y
Install containerd
To install Containerd, use the following commands:
sudo mkdir -p /etc/apt/keyrings
curl -fsSL https://download.docker.com/linux/ubuntu/gpg | sudo gpg --dearmor -o /etc/apt/keyrings/docker.gpg
echo "deb [arch=$(dpkg --print-architecture) signed-by=/etc/apt/keyrings/docker.gpg] https://download.docker.com/linux/ubuntu $(lsb_release -cs) stable" | sudo tee /etc/apt/sources.list.d/docker.list > /dev/null
sudo apt-get update
sudo apt-get install containerd.io -y
Create containerd configuration
Next, create the containerd configuration file using the following commands:
sudo mkdir -p /etc/containerd
sudo containerd config default | sudo tee /etc/containerd/config.toml
Edit /etc/containerd/config.toml
Edit the containerd configuration file to set SystemdCgroup to true. Use the following command to open the file:
sudo nano /etc/containerd/config.toml
Set SystemdCgroup to true:
SystemdCgroup = true
Restart containerd:
sudo systemctl restart containerd
Install Kubernetes
To install Kubernetes, use the following commands:
curl -s https://packages.cloud.google.com/apt/doc/apt-key.gpg | sudo apt-key add
sudo apt-add-repository "deb http://apt.kubernetes.io/ kubernetes-xenial main"
sudo apt install kubeadm kubelet kubectl kubernetes-cni
Disable swap
Disable swap using the following command:
sudo swapoff -a
If there are any swap entries in the /etc/fstab file, remove them using a text editor such as nano:
sudo nano /etc/fstab
Enable kernel modules
sudo modprobe br_netfilter
Add some settings to sysctl
sudo sysctl -w net.ipv4.ip_forward=1
Initialize the Cluster (Run only on master)
Use the following command to initialize the cluster:
sudo kubeadm init --pod-network-cidr=10.244.0.0/16
Create a .kube directory in your home directory:
mkdir -p $HOME/.kube
Copy the Kubernetes configuration file to your home directory:
sudo cp -i /etc/kubernetes/admin.conf $HOME/.kube/config
Change ownership of the file:
sudo chown $(id -u):$(id -g) $HOME/.kube/config
Install Flannel (Run only on master)
Use the following command to install Flannel:
kubectl apply -f https://raw.githubusercontent.com/flannel-io/flannel/v0.20.2/Documentation/kube-flannel.yml
Verify Installation
Verify that all the pods are up and running:
kubectl get pods --all-namespaces
Join Nodes with docker installation
To add nodes to the cluster, run the kubeadm join command with the appropriate arguments on each node. The command will output a token that can be used to join the node to the cluster
---------------------------------------- Kubeadm Installation ------------------------------------------
-------------------------------------- Both Master & Worker Node ---------------------------------------
Run as root:-
apt update
curl -fsSL "https://packages.cloud.google.com/apt/doc/apt-key.gpg" | sudo gpg --dearmor -o /etc/apt/trusted.gpg.d/kubernetes-archive-keyring.gpg
echo 'deb https://packages.cloud.google.com/apt kubernetes-xenial main' > /etc/apt/sources.list.d/kubernetes.list
apt update -y
apt install kubeadm=1.20.0-00 kubectl=1.20.0-00 kubelet=1.20.0-00 -y
apt install docker.io -y
--------------------------------------------- Master Node -------------------------------------------------- Run as root:-
kubeadm init
mkdir -p $HOME/.kube sudo cp -i /etc/kubernetes/admin.conf $HOME/.kube/config sudo chown $(id -u):$(id -g) $HOME/.kube/config
kubectl apply -f https://github.com/weaveworks/weave/releases/download/v2.8.1/weave-daemonset-k8s.yaml
kubeadm token create --print-join-command
------------------------------------------- Worker Node ------------------------------------------------ Run as root:-
kubeadm reset pre-flight checks -----> Paste the Join command on worker node with --v=5
---------------------------------------on Master Node-----------------------------------------
kubectl get nodes
Removing kubernetes completely:
kubeadm reset
sudo apt-get purge kubeadm kubectl kubelet kubernetes-cni kube*
sudo apt-get autoremove
sudo rm -rf ~/.kube

sudo kubeadm reset

sudo apt purge kubectl kubeadm kubelet kubernetes-cni -y
sudo apt autoremove
sudo rm -fr /etc/kubernetes/; sudo rm -fr ~/.kube/; sudo rm -fr /var/lib/etcd; sudo rm -rf /var/lib/cni/

sudo systemctl daemon-reload

sudo iptables -F && sudo iptables -t nat -F && sudo iptables -t mangle -F && sudo iptables -X

# remove all running docker containers
docker rm -f `docker ps -a | grep "k8s_" | awk '{print $1}'`

Get Connected:
If you have any suggestion about this post feel free to let me know and be updated on my blog in the following ways:
#TrainWithShubham #DevOps #chatgpt #AI #devops #devopsengineer #devops2023 #devopscommunity #devopslife #devopsnotes #DevOpsGuys #DevOpsHandbook #devopsinuk #shellscript #linux #kubernetes #kubeadm
